Tech Tips

Did you get a Gift Card that you have no interest in using?

HAPPY NEW YEAR, Everyone!!!

Sorry things have been quiet on this end, but I got caught up in the holiday crazies (and loved every minute of it!). The days just seemed to fly by. Now that we’re in the January doldrums, it’s time to get back to work!

I am always amazed by the number of Gift Cards are are given/received each year. It seems like the numbers just go up and up and up. While I usually love getting a gift card, there are times when someone purchases a card that isn’t for a store/restaurant that one can actually frequent. Maybe someone bought you a gift card for Applebees, but the nearest Applebees is over 50 miles away. You might like getting the card, but never have a chance to actually USE it – or using it is impractical!

Well, if you’ve found that you have one or two of those ‘less than useful’ gift cards in your possession and you’d like to get some cash for them, you don’t need to beg an exchange with friends anymore. There are actually several sites which allow you to sell your unwanted gift cards for a fair percentage of the face value. WOOHOO!!

I came across two good articles this week that wrote about this phenomenon and decided that I would share what I read. The first is on a favorite site of mine: CNET How To. “How to sell your unwanted gift cards” by Jason Cipriani was the first that I came across. I was fascinated because it never dawned on me that such sites existed (although in retrospect, it makes sense).

The second article I found on a My Money Blog. Entitled “Selling Unwanted Gift Cards for Cash“, this one caught my eye, as well…probably because after reading the first article, I was pondering the pros/cons/risks of, in essence, reselling gift cards.

There appear to be four major services specializing in Gift Card “redemption”:

Cardpool.com
PlasticJungle.com
GiftCards.com
GiftCardRescue.com

For each type of card you want to redeem, compare between the sites – some pay better on one type of card and another may pay better on another type of card. I did a quick ‘what if’ with a card that I got (but which I’m not really going to redeem because I want to use it) and found the following results on the quote:

Regal Entertainment Card worth $25.00 face value would fetch:

Cardpool.com: $18.00
PlasticJungle.com: $18.00
GiftCards.com: $18.25
GiftCardRescue.com: $17.50 for Cash or $18.38 for an Amazon Gift Card

Both these authors cited above have done some good research on the topic and written excellent articles. Please check them out for further details, but I wanted to let everyone know that if you got a gift card for someplace you simply can not or will not patronize, there may be an option to turn that card into cash.

(Disclaimer: I have NOT completed any transaction, so can only go on the comments others have left regarding the subject)
How can I access my Bookmarks or Favorites from any computer?

There are so many times when I’m working on a computer that is NOT my own and I want to get to some website that I have bookmarked (set as a ‘favorite’) on my computer. Worse still if you work primarily on public computers and can’t save your own set of bookmarks at all. Maybe you have a personal computer and a work computer, and somehow, the favorite that you need to reference always seems to be on the other computer. Some URL’s (e.g. Google) are obvious, but others are well-hidden or buried or not entirely ‘findable’ without the help of that precious bookmark.

Is there a solution? Is there a way to make your bookmarks/favorites ‘portable’ or accessible from ANY computer? You betcha!!!

Time to check out www.aboogy.com.

With Aboogy, you can set up all your favorites that can be accessed from any computer – as long as you remember you Aboogy signon. When you first go to www.aboogy.com, you’ll be asked to create a user ID and password, then click on a confirmation e-mail from Aboogy. Once that’s done, you are ready to roll with setting up your own list of favorites/bookmarks/shortcuts that can be accessed from ANY computer.

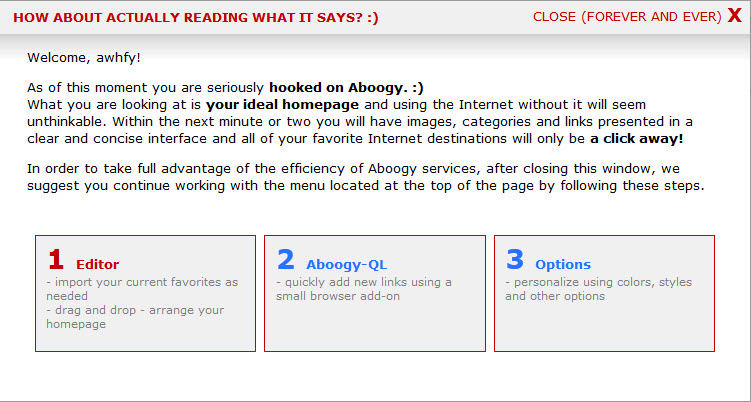
Your first time signing in to Aboogy, you’ll be asked to read this screen – they’ll only show it once!

Once you’ve closed that screen, you’ll be able to set up your favorites and tracking a variety of ways – buttons, links, images, categories – all under YOUR control!!

Start by importing your existing bookmarks or favorites from your computer:

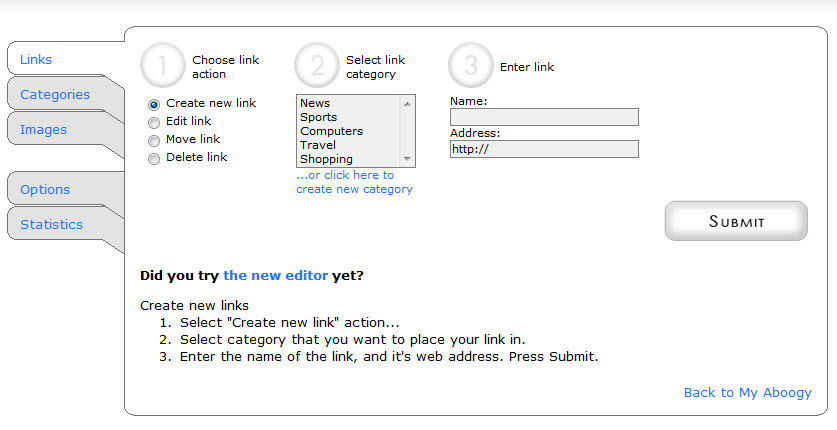
Next, edit and organize the links as you like using the ‘Editor’ tool:

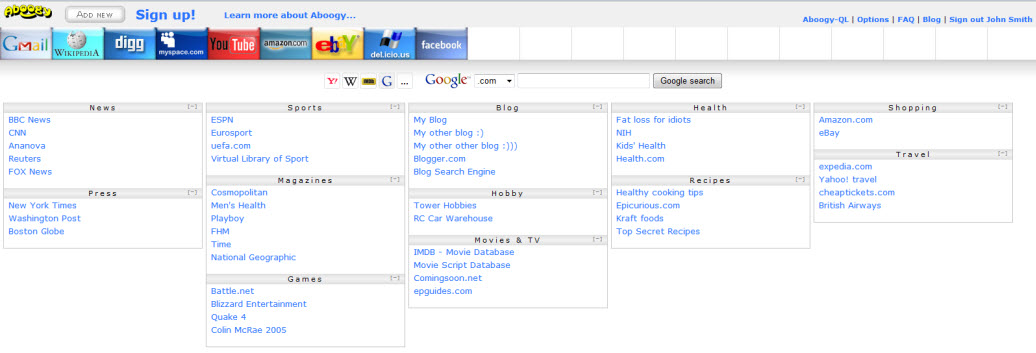
Head back to your Aboogy page and VOILA! Your bookmarks/favorites are all available to you from ANY computer:

The additional benefit is that if your computer crashes, you haven’t lost your library of bookmarks/favorites – even if backing up isn’t on your regular schedule (though shame on you for ignoring that critical chore :-)!)

Managing Photos and Video – it is soooo not my ‘thing’

Just so you know, managing photos and videos are really NOT my ‘thing’, yet questions on these items tend to generate a bunch of questions by readers of my blog. Honestly, my solution is ‘let someone else do it’, but that’s not really offering useful advice now, is it? I don’t think that ignoring the subject is too useful, either.

Confession: I have NEVER actually shot a video (well technically, that’s not true…one time I accidentally switched my digital camera to ‘video’ and took a time-lapse ‘photo’, but I don’t think that that counts).

I DO take photos from time-to-time, but I’m not the family historian, either. I do NOT enjoy spending a lot of time tweaking photos, either. I AM pretty good at resizing images and cropping them. That’s the level of my ‘expertise’. To the graphic artists and some others, I’m sure, that sounds pretty lame, but its the truth.

Unfortunately, this makes me push the requests for information on video/photo editing into the ‘too hard’ basket :-). Sorry gang, just being honest.

SOOOOOOOO, when I saw an article in PC World, written by Patrick Miller, titled “Shoot, Share, and Edit Your Photos and Video on the Cheap” I gave a whoop! Someone else has the information that my readers have been requesting. YEAH!!!!

Patrick gives you links to video editing (cheaply) in this article. Additionally, he gives you tips on photo editing and sharing by sharing this link. (Both articles are written by Jonathan Wylie, also of PC World).

Let me say a heartfelt – thank you, Patrick (Jonathan, we thank you, as well…Patrick pointed, you actually compiled the information)!!! You ventured where I just haven’t trod!!!

I will add my 2-cents worth here: No program, particularly those which are free, is perfect. Each service is going to be stronger in one area than another. Before putting all your ‘eggs’ in one basket, upload a few images or videos and ‘play around’ with the various alternatives. For some people one feature is more important than another. Find the service that is stronger in those areas that are most important to you and then start loading up that ‘basket’!

Happy editing and sharing!!!!

Get tired of your desktop background (wallpaper)?

When you spend as much time behind your computer as I do, sometimes you just want to do something ‘fun’ with your computer…I don’t mean ‘fun’ as in playing games (well, maybe YOU want to do that, but it’s just not my thing). By ‘fun’, I mean spicing up your computer with ‘funner’ things than the standard defaults.

We’ve talked about “Fences” in another post (click here to check out that desktop organization tool) which allows you to better organize your desktop. That was more of a ‘functional’, rather than ‘fun’ find.

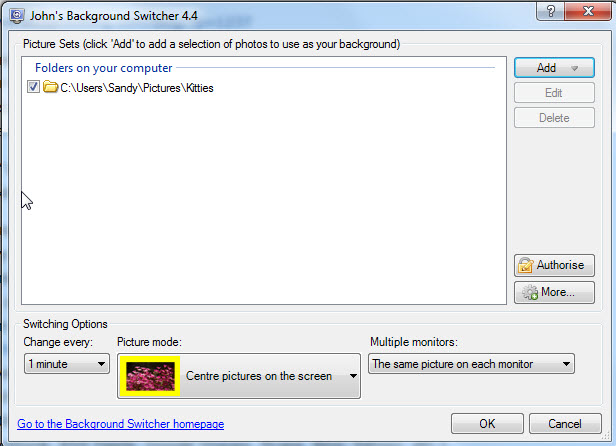
Today, I ran across something called ‘John’s Background Switcher’. When I went to his website, John sounds like my kinda guy! He finds a solution to a computing problem, then allows the world (yes, you and me) access to the fruits of his labor free of charge. His work is called ‘donationware’. You can use it for free if you like, but if you feel you get value from it, he’d appreciate a donation (there’s a link on his website to allow you to donate should the mood strike you). You can check his site out here. The ‘Background Switcher’ allows you to change the background on your desktop (not the screensaver, but the wallpaper) on a regular basis – from every 10 seconds to once a week! The images that are placed as your background can come from the ‘stash’ you have on your computer or from any number of a variety of sources (Flickr, Facebook, RSS Feeds, Google Images, Picasa, Bing, Yahoo!, etc.). So if you like images from National Geographic, go out and create a link to their photos, and your computer wallpaper will update with the images.

To download, simply go here for a secure, verified download. Run the install, then set it up. Took me a total of 2 minutes to have a rotating wallpaper on my computer. The software appears to be ‘low overhead’ meaning that it will not drag your computer to its knees simply by its presence.

As of right now, I have only added a folder of images of my cats to rotate, but I’ll be playing with the settings and adding more ‘feeds’ – either from my computer or from the web.

You’ll note that you can change the duration that an image stays on your desktop, select how large the image is (you can even create a montage), display different images on different monitors, add multiple feeds (I only show one added here).

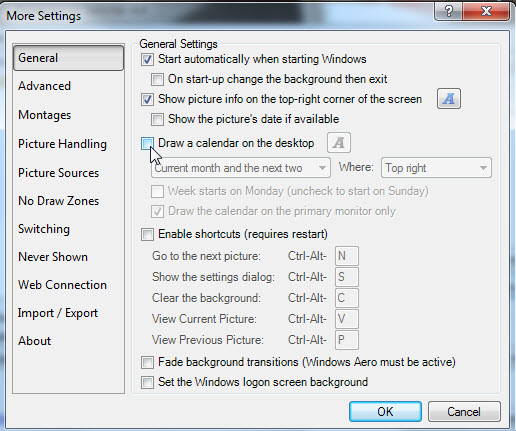
There are also a wide variety of more detailed settings if you feel like playing around with them. (Pressing the links on the left changes the settings you can set on the right)

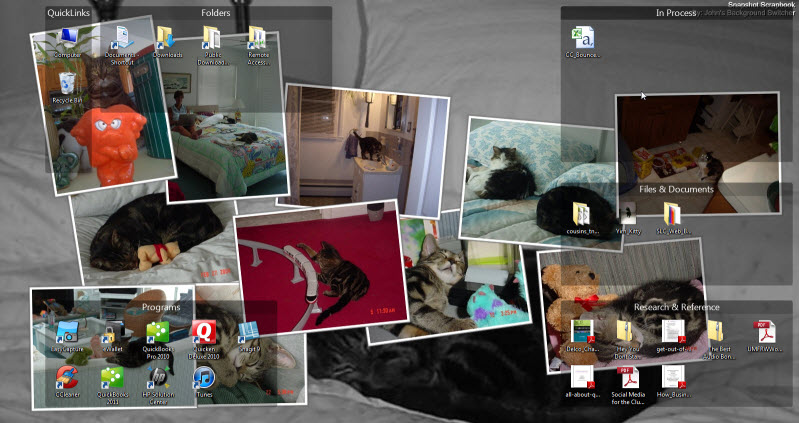
With just a couple of clicks of my mouse, here is what my desktop looks like (much ‘funner’!!):

Even people like me who are ‘creativity impaired’ can be creative with this little program. Thanks, John!!!

Want to set up Word with YOUR default Fonts and settings?

Ah…Microsoft Office…love it or hate it, for many of us, it is a way of life. Part of that life, of course, includes Microsoft Word for all things document or, ahem, ‘word’ related (sorry, I saw the pun coming off of my fingers as I began typing and just had to leave it in there). Unfortunately, the ‘look and feel’ that I like in my documents may be very different than the look that you prefer in yours, but unless we take the time to change the well-hidden defaults in Word (Microsoft Word, that is), we find ourselves having to format and reformat with every document.

Alas, I FINALLY found where one goes to change the default font, line-spacing, paragraphing, etc. thanks to a small blurb in PC World Magazine (I give full credit to Christopher Null, though I’ve added some screenshots to help clarify). For those of you who have been looking to change the defaults (and I know that there are some out there because we’ve talked about it) take heart – this only takes a minute – and that minute will be the LAST TIME you have to format the base Word document to your liking :-)!

By the way, that ‘default’ style in Word is called the ‘Normal Style’…just to add confusion to confusion!

Open up a blank Word document and begin typing some text. Type a chunk of text that will include paragraphing, alignment, carriage returns, etc. The basics of a Word document for you.

Above is the "Normal" font for Microsoft Word


Now, change this default font to the font you want as the ‘default’ (or ‘Normal’ as Microsoft defines it):

Above is the altered text to 'my' style for Word


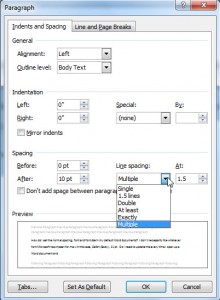
If you want to adjust the paragraph style, line spacing, etc. (in other words, more than just the font and/or font size), select some text within the document you are creating, and right-click on it. Choose ‘Paragraph’. It will bring up this screen:

Make any adjustments to the paragraphing, line spacing, etc. Note: There are two tabs on this screen…play with all the settings and find the ones that you want. The screens are similar in both Office 2003, 2007 and 2010 – not exactly, but similar.

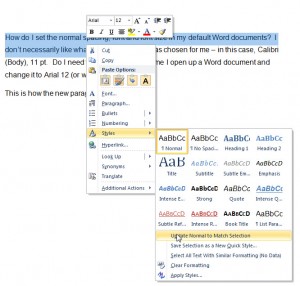
Now, select some of the text. In 2007 or later, you’ll right-click and select ‘Styles’ (the screens I’ll show are from Office 2010) [In 2003, you’ll right-click and select ‘Font’, then click ‘Default’]. Now, click on ‘Update Normal to Match Selections’:

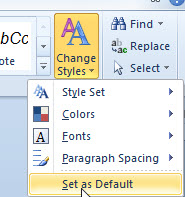
If you want this set of selections to be PERMANENT when you open up a new document, go to the Word ribbon, and select ‘Change Styles’, then ‘Set as Default’ (at the bottom of the list):

Now, close this document. Open a new document and begin typing. Voila!!!

Your new ‘normal’ is defined as the baseline!

How do I avoid getting bitten by a computer ‘bug’?

It seems like every day brings a new rash of evil-doers on the virtual highway. Steering clear of the bad guys can sometimes feel like a full-time job, but there are a few tricks you can use to protect yourself with little effort.

FIRST AND FOREMOST, make sure that you have anti-virus/anti-spam/anti-malware security software installed on your computer and KEEP IT UP TO DATE!!!! McAfee, Norton and Kapersky are three of the most common names in computer security, but there are plenty of others. AVG offers a free version to personal (non-commercial) users.

Now that that little lecture is out of the way, let’s discuss your e-mail. WHEN IN DOUBT, DELETE.

One of the most insidious ways to attack your computer is by your very own e-mail. Clicking on links that are from seemingly ‘safe’ site, or opening attachments from apparently ‘safe’ sources is an almost guaranteed way to get an evil virus on your computer.

Now that you’re scared to death to read your mail, how do you protect yourself? Really, it’s pretty easy. Here’s what you do – and it only takes a second…it doesn’t have to interfere with your production…VERIFY THE LINKS BEFORE YOU CLICK.

How?

Easy.

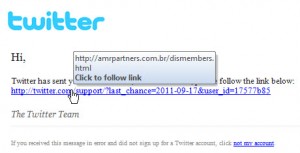
See the image above…it APPEARS to have come from Twitter. They’re telling me that I have a message to read. BUT…it’s not from Twitter…its someone phishing for information from me…trying to steal my signon and password.

The first ‘clue’ that this isn’t from Twitter is the fact that they say ‘Hi’, not ‘Dear Sandy’ (or whatever name you’ve used on your account).

The next clue comes if you hover your cursor over the link the phisher wants you to click:

You’ll notice that this link, which is masked to look like it would go to Twitter (and should read something starting with www.twitter.com), has a link to some unknown site. That site is NOT Twitter, and not safe to click. If I really thought Twitter wanted me to check something out on my account, I would open up a browser, type in the URL (www.twitter.com), and go to my account to check it.

Here’s how easy it is to do. I created the link below (this one happens to be safe to click on, but it will NOT take you to Twitter):

http://www.twitter.com

The link above LOOKS like a legitimate link to Twitter when you first see it, but the link actually takes you right back to this blog! It APPEARS to go to Twitter, but no…it comes right back to me…and it COULD just as easily have gone to some nefarious site.

If you hover over the link on the screen (if you’re trying it, hover over the link above…the image below is just that, an image):

Then, look to the lower-left corner of your browser screen, you will see the ‘real’ destination revealed:

It’s that easy to see where someone is trying to send you – via an e-mail (hovering over the link in the email displays the real link) or on a regular web page (hovering over the link will make the real URL appear on your screen, probably in the lower-right corner of your screen).

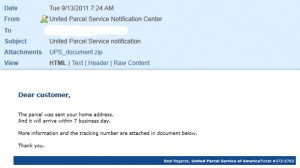
If you get an e-mail with an attachment from someone you don’t know (they may say they are UPS, FedEx or the USPS) telling you to open the attachment to find out about a delivery you missed, STOP! DO NOT OPEN IT!! [One regular reader of this blog found that out the hard way and had to spend days trying to recover their computer. He happened to be waiting for a UPS delivery, so thought it was legit. Unfortunately, opening the zip file corrupted his hard drive.]

A fake notification will have some tell-tale signs:

First, it says ‘Dear customer’…if they know enough to send ME an e-mail, they KNOW my name!

Next, there is no information about the shipment in the subject or body…only a link. Legit shipments contain some detailed information in the shipping notification which will assure you that the e-mail is real.

A REAL notification will include information in the subject and/or body that you can enter directly into www.ups.com or www.fedex.com or www.usps.com in order to track the shipment (you don’t need to click links).

Your name and/or address will appear in the body of the e-mail.
A tracking number or other package information will appear in the subject line or body of the e-mail.
None of the major shipping companies will attach the information in a zip, word, pdf document.

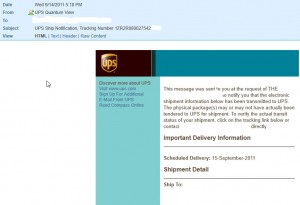
(Note: I’ve blanked out some of the personal information on this image, so you won’t see the full tracking number or address, but you get the idea).

If I wasn’t sure that this e-mail was legitimate, I could go to www.ups.com and enter the tracking number given in the e-mail. Again, there is no reason to trust the links in the e-mail.

So, to sum it up:

1. Legitimate e-mails will address you by name.
2. Hover over the link they want you to click and see if the URL is legitimate.
3. When in doubt, open up a browser and type in the url manually, then check whatever the e-mail is trying to get you to check by entering through the ‘front door’ instead of taking the shortcut.
4. Do NOT open up attachments from people you don’t know.

Password Management…grrrrr…but, ya gotta do it!

I know, I know…no one likes to think about Password Management, nor do they like to think of how vulnerable their information might be using weak and/or the same passwords on many sites. Just thinking of this issue raises my blood pressure and nerves several levels! It just feels so unwieldy.

I don’t know about you, but at last count, I had 432 passwords in my ‘repertoire’. I know that I’m not unusual…we ALL have a bunch (I guess 432 is more than a ‘bunch’, isn’t it?) of passwords to manage. There is no way, unless I suppose I had a photographic memory (which I don’t), that I could remember that many passwords.

What do we typically do to handle this onslaught of self-created information? We don’t change our passwords regularly (bad), we reuse passwords (pretty bad) and/or we use relatively simple passwords (very bad) to make that list more manageable. Even using some of these ‘shortcuts’, I can never seem to remember if this is the time I had to capitalize the first letter or add a special character to meet the password ‘rule’ that this particular site enforces.

On top of all of that, we keep a list of passwords in an Excel file, on sticky notes plastered around the frame of our monitor, or on pieces of paper in our top-desk drawer. Again, NOT GOOD!!!!

So, what’s a body to do???

First of all, do NOT store your passwords in a file on your computer called ‘passwords’ :-)!! Next, do NOT store them in a password protected Excel and/or Word file. Instead, try a password management tool on which you put a VERY STRONG* master password that’s not used as a password anywhere else as your password.

As I’ve struggled with finding the best tool(s) to manage passwords, but I’ve come up with a few gems that might help others to deal with password-rage!

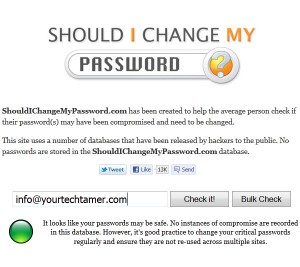
First, check to see if your e-mail address has shown up in a compromised database…this isn’t foolproof, but it’s a start. Go to ShouldIChangeMyPassword.com, enter your e-mail address, then see if you get a “green light”.

Should I Change My Password

Next, begin changing your passwords. Make sure that the new passwords are different from one another and STRONG*. You can check a password’s strength using any number of tools…CNET describes several of them here: Check Password Strength

Now, store those passwords in a SECURE manner. If you choose to store them on your computer itself, make sure that you put them in a ‘vault’ using a tool like KeePass Password Safe or Password Safe. Both of these tools are FREE and store your data in an encrypted format.

If you want to carry your passwords with you and need to store them on your Android or iOS device, eWallet may be the way to go. There is a cost ($19.99 at this writing) for the product, but it can by sync’d between your computer and your devices and gives you a similar interface in both places. Just go to the eWallet site and check it out!

So, what are your ‘going forward’ steps?

1. Download/install a new password storage system
2. Go to the most important sites first (e.g. bank accounts) and change your password NOW!
3. Go to ‘other’ sites (perhaps a couple a day) and continue changing your password
4. Delete, delete, delete the old, unsecure file on your computer
5. Throw away the scraps of paper in your top desk drawer or on your monitor!
6. Change important passwords every 3-6 months.

* “STRONG” passwords are passwords that:
Are over 8 characters long and include lower-case, upper-case, numbers AND special characters (e.g. !, @, #, $, etc.).
Do NOT contain your user name, real name, company name.
Do NOT contain complete ‘real’ words.
Are significantly different than previous passwords.

You have to use ALL of these recommendations to make a password ‘strong’.

Getting more accurate results from your Google searches

Sorry for the tardy post, but it’s been a busy couple of weeks…where do I begin…first, I had an emergency reconstruction of my laptop. Yes, my 5-year-old Lenovo finally bit the dust. While it caused a bit of a scramble, I lost NO DATA because I had it all well backed up – in several places!!! What I did NOT do was to simply set up the new laptop exactly as the old…for a few reasons…the new laptop is Windows 7 (old one was Windows XP), new laptop is Office 2010 (old one was Office 2003), etc. Take the time and do it right!! Next, we had the earthquake (well, I can’t really count that because I never even felt it!). Lastly, we had Hurricane Irene come and visit. All is well, but the first and the last certainly sucked the time out of the space/time continuum :-).

Now, to the post at hand!! I am amazed when I speak with certain people and they seem to be able to mine Google for EXACTLY the information that they want in a VERY short period of time. Oftentimes, I find myself trying multiple search strings, and never getting to the exact information that I want…or I have to dig through oodles and oodles of irrelevant data to find the information that I’m looking for.

There are a number of simple search techniques which may help you get to more accurate results the first time you Google something:

1. Make sure that your query (the words you type into Google) are an accurate representation of what you’re looking for. Sounds obvious, but too often, people just search willy-nilly and never really think about the keywords in their search. Really consider what you’re looking for. Are you looking for restaurants in New York City, or are you looking for a coffee shop New York City Upper West Side? The latter will get you alot closer to finding that ideal greasy spoon!!!

2. If you’re searching for a phrase – that is, you want all the words and in a particular order (e.g. Mother Teresa), then include the search string in double-quotes like this “Mother Teresa”. That will eliminate any articles containing the words ‘mother’ and ‘Teresa’, but not necessarily together. The quotes force the search to look for the words within the double-quotes as if they were one word. ALWAYS include proper names within quotes. You’re much more likely to find the person you’re looking for quickly!

3. If you get a lot of off-topic results, you can EXCLUDE certain results by adding a ‘-‘ (minus) in front of the words to exclude. I’ll give you an example. I have a client whose name is the same as a famous drummer. Let’s use the name ‘Phil Collins’ as the example (my client’s name is NOT ‘Phil Collins’, but I need an example). If you simply Google “Phil Collins” (notice, I use the double-quotes because I want both words to be treated as one word), you’ll get all kinds of results for the drummer in the band Genesis or the solo performer. So, if you want results for A Phil Collins, but not THAT Phil Collins, use a minus sign to exclude results with certain words. If I Google “Phil Collins” -Genesis -drummer -music, I will actually get to see an entry on the first page of results for someone OTHER THAN ‘THAT’ Phil Collins…Phil Collins Bridal appears on the first page of results, as does a baseball player by the name of “Phil Collins” who, apparently, played for my beloved Phillies at one point in time! So, I have excluded ALOT (but not all) of the musical Phil Collins results by making sure that the words ‘Genesis’, ‘drummer’ and ‘music’ do NOT appear on the results page. Sometimes you have to minus alot of words to exclude the ‘noise’ that Google results can return.

4. If you want to search within a certain site (e.g. I use PC World and CNET all the time as reference points), you can search within the site right from Google. Just enter ‘site:sitename’ (do not include the ‘), so that your search might look something like google search tips site:pcworld.com. You include the search string of what you’re looking for, THEN add the ‘site:sitename’ to the end. That will search find any relevant results, but ONLY at www.pcworld.com.

Speaking of PC World, they have some FABULOUS Google Search tips. Run the search above…see what other gems can make your life easier! Or, check out Google’s own description of some search techniques Google Search Help

What’s your favorite search technique?

Can you create a shortcut to auto-paste your email address onto the clipboard?

Back in May, I wrote about ways to create your own keyboard shortcuts
(Click here to see that post). A reader of that post posed the following question:

Do you know how to create another type of shortcut? I want to have my email address entered with a Ctrl + something.

Normally, I don’t post articles two days in a row, but I wanted to get the reader the response, and this isn’t something that I can copy/paste into an e-mail, then post later. So, this week we’re having a rare ‘two days in a row’ posting.

Well, it took a bit of digging, but we found a way to add your e-mail address to the clipboard with shortcut keystrokes, then you can use CTRL+V to paste the e-mail anywhere you need it.

NOTE: This assumes that the reader is using Windows 7. For readers who are still on Windows XP, you’ll need to incorporate another program (http://www.nirsoft.net/utils/nircmd.html) to add the information to the clipboard (using the “Add the text content of clipboard to info1.txt” related command because Windows XP does not recognize the ‘clip’ command used in the batch file below).

So…Windows 7 users, continue on! Windows XP users, I’ll make a note below where you’ll need to install/reference the additional program.

First, open up Notepad by going to “Start, All Programs, Accessories”, then selecting ‘Notepad’.

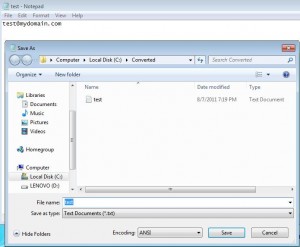
Enter your e-mail address (or any other text that you want copied to your clipboard using the shortcut you’re going to create), then save the file to a location of your choosing as shown below by selecting “File, Save As” from the toolbar:

Create Text File
(click on any image to see a larger version of the image)

Next, open up a new document in ‘Notepad’.

Type in the following two lines (or copy/paste from below):

C:\Windows\System32\cmd.exe /k clip < c:\Converted\test.txt
c:\exit

Substitute the location/name of your text file for the portion of the code which reads ‘c:\Converted\test.txt‘. Everything else should match what is typed above exactly.

Windows XP users, assuming you have downloaded and installed the NirCmd utility, you would substitute the following line:

nircmd.exe clipboard readfile “c:\My Files\info1.txt”

for the first line (C:\Windows\System32\cmd.exe /k clip < c:\Converted\test.txt) above. Everything else should be the same.

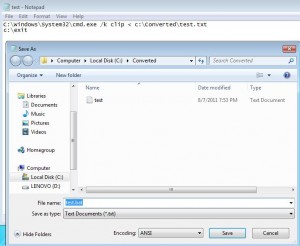
Save the newly created file to whatever location you want, but change the extension to ‘.bat’ instead of ‘.txt’. By this, I mean that you go to “File, Save As”, select a location, then name the file ‘whatever_you_want.bat’ where you substitute your own word for ‘whatever_you_want’, but be sure to end it as ‘.bat’ in the ‘filename’ location. In the sample below, it is being named ‘test.bat’.

Create batch file

At this point, you’ve created the files which will place your e-mail address on the clipboard. Now, you have to create a shortcut, and assign keystroke shortcuts to that shortcut.

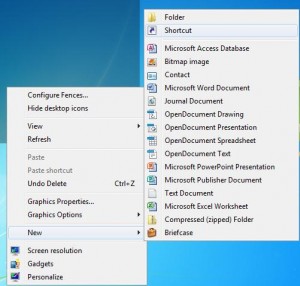
So now, go to your Desktop (or any other location you want to create your shortcut). Right-click in blank space (i.e. not when you’re hovering over any other files/icons) and navigate to “New, Create Shortcut” as shown in the image below.

Create Shortcut

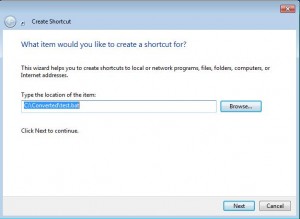
This will take you into the ‘Create Shortcut’ wizard.

Use the ‘Browse’ tool to locate the batch file that you just created above (the one ending in .bat, NOT the one ending in .txt).

Program Location

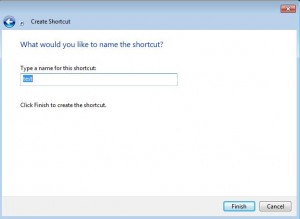
Next, enter the title you want on this shortcut.

Shortcut Name

When you press ‘Finish’, the newly created shortcut will appear on your Desktop, or in the chosen folder.

Shortcut

Hang in there…you’re almost done!

Right-click your newly minted shortcut and select ‘Properties’

Shortcut Properties

The field labeled ‘Shortcut Key’ will read ‘None’ when you first see it. Click into the field, and press whichever letter you’d like to have the shortcut execute (in the sample, I pressed the ‘A’ key – nothing else). Windows will automatically fill in CTRL+ALT.

Click ‘OK’ to save your setup.

Now, when you press the CTRL+ALT+A keys on your keyboard (regardless of where you are), whatever is in the txt file that you created will be copied to the clipboard. If I now open a blank Word document (or put my cursor in the ’email’ field of a website), and press CTRL+V, the e-mail (or whatever I had stored in that text file) will paste into that location.

Voila!! You’ve created your own mini program which allows you to have a keyboard shortcut to entering your e-mail address (or any other information you need to enter frequently).

Is your virtual desktop out of control?

I don’t know about you, but my computer desktop gets wayyyyyyyyy out of control (truth be told, my physical desktop needs some help, as well, but no one but me can help me there!). The icons on my computer desktop run amok. I have all kinds of 1/2 completed documents out there (temporary storage while I’m working on them). I have shortcuts to favorite programs. I have shortcuts to frequently used folders. I have some training PDF’s that are waiting for me to have time to work on them. I try to drag them into a logical order – Programs, you go ‘stand’ on this side. Training docs, you go to the lower-right quadrant. Truly temp files…please locate yourselves in the top-right corner. Etc. That’s all fine and dandy until I add a new icon to the desktop and it simply takes the ‘next available’ space. Then, I try to reorganize them, but the Windows ‘arranging’ features work against me (even if I have the ‘auto arrange’ feature turned off). In the end, I give up, Windows wins, and I just have to hunt and hunt to find the icon that I’m seeking when I need it :-).

I know that Apple products handle desktop organization more elegantly, but do we Windows users have to deal with what we’ve got?…or can we take control?

WE CAN TAKE CONTROL!!!

I ran across a free utility that allows Windows users to better ‘herd’ (i.e. organize) desktop icons by creating designated types of groupings that users can more readily manage. I downloaded the free version, but the paid version ($19.95) allows additional controls. Even with the free version, I’m happy that I can now find what I’m looking for on my desktop.

The utility is called “Fences” (makes sense because it puts ‘fences’ around your desktop icons, isolating them in logical groups). It is made by Stardock and is available for download here: download “Fences” here.

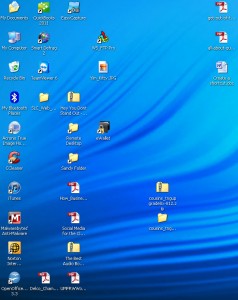
For demonstration purposes, I picked a desktop that wasn’t HORRENDOUSLY cluttered to be able to show an example of the before and after.

Here’s the before image:

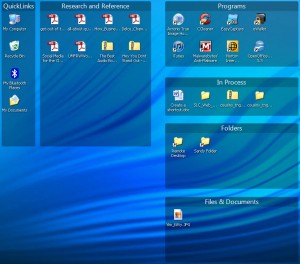
Here’s the after image:

I was able to move the location of the fences, rename the fences, add/remove icons from the fences very easily. New icons get added to the ‘non-fenced’ locations…then you can drag them within whichever fence you like.

All-in-all, I like being able to ‘tidy up’ my desktop simply by organizing the icons in a fashion which makes sense to me. Users can change a number of aspects of the appearance of the fences, but what you see above is the default. You can also back up your settings, so that you can recover, in case someone ‘messes’ with your desktop.

From an efficiency standpoint, just like having a good filing system in a filing cabinet, or good organization to your virtual documents, having good organization for your virtual desktop is essential to being able to work in the most effective manner possible – Now I just have to work on my physical desktop!