Making your website mobile-friendly…you have to do it!

Greetings, All –

I am so sorry for the lack of posts this past month…Honestly, it feels like I just wrote the last post a week ago, and it’s already a month old. Oye! How does that happen?!?!

First, a very Happy Thanksgiving to all our readers here in the United States. It is a time to give thanks, and I certainly thank all my loyal readers and clients – for without you, it’s no fun.

We all know that more and more people are checking out websites on their smartphones. People are on-the-go…they hear about something and immediately check it out – from their phone. UNFORTUNATELY, a ‘normal’ website will not appear correctly on a phone…well, that’s not exactly right…they appear correctly many times, but they might be itty-bitty and no mere mortal (certainly, not any mortal over the age of 35) can actually read the text, or images and text can be ‘off’. That said, converting your site can often end up in the ‘too hard’ pile…We don’t know how to go about it, we don’t have time to do it…whatever the excuse.

A reader of this blog asked if I knew ‘how to make a website mobile’. While I knew THEORETICALLY what was involved, I didn’t really know the HOW – having put my own website in the ‘too hard’ pile for making it ‘mobile-friendly’. So, I figured that it was about time to figure it out. Imagine my happiness and delight when I found a GOOGLE related site which helps you -for f*r*e*e – convert your existing site to a mobile application.

Follow along…it’s really not a bad experience!

Here is the ‘traditional’ home page for our website YourTechTamer.com

Your Tech Tamer traditional home page

We want to ‘mobilize’ this site using Google’s HowToGoMo application (HowToGoMo.com). The music to my ears (well, eyes), was the link ‘build your free site now‘.

Enter your URL and press ‘Make My Site Mobile’. GoMo presents you with an initial mobile layout that you can then edit:

GoMo layout

You can play around with any number of designs, or leave it at the default created. Once you’re happy with the basic design, it’s time to work on changing colors, etc. Click on ‘Next’ to bring up the next screen:

Go Mo Edit Design

I only changed the number of navigation items showing, but you can change any number of different things to customize the look and feel of your new mobile site. You can create a ‘push to call’ button. You can change colors/images. Basically, let your creativity shine and see where it takes you! Once you’re done, you’ll need to create a signon for ‘DudaMobile’ (they’ll be hosting your new mobile site). Once you’ve entered the information, its time to PREVIEW your new mobile site – see how it appears on the four major types of mobile devices:

Preview Mobile Website

Make sure you check how your individual pages appear…because that’s as important as how the navigation adjusts. Some highly formatted pages do not ‘mobilize’ well. Check with your web developer if they don’t.

You can also setup blogs as mobile sites – check out the mobile version of this blog at http://mobile.dudamobile.com/site/yourtechtamerblog from your smartphone.

If you’re happy with it, hit ‘Setup My Mobile Website Redirect’. This publishes the mobile site on Duda’s servers:

Mobile Conversion Publish Site

Lastly, you need to give a snipped of code to your webdeveloper to put in the header of the home page of your website. It’s an easy step and is explained very well on this screen:

Why do you need this? You need it to allow users to be directed automatically to the correct site for them based upon the device that they are using. The web can be intelligent enough to know when someone is trying to search on a site from a mobile device. If it senses that the ‘searching device’ is a mobile device, it will automatically redirect the user to the ‘mobilized’ version of the site and away from the ‘standard’ website.

There’s only one caveat…the mobile site is only free for a year…after that, it will be $108…but the good news is that you don’t need to leave a credit card on file…use the site for a full year and see how you like it…tweak it and adjust it. At the end of the year, you can pay the $108 OR you can actually give your website developer the code that was created from the site (yes, you can get to the HTML and CSS code within the ‘build your mobile website’ screens) and integrate it into your own website code. Either way appears to work.

At worst, you get experience – for free – with what you want to appear on a mobile site…then you are a knowledgeable consumer if you choose to have the mobile site integrated into your hosting…and you can show a website designer exactly how you want it to appear.

Have fun MOBILIZING!!!!

Want to read web pages later and from your other devices?

How many times have you found yourself waiting in line, sitting in a doctor’s office waiting room, racing to meet someone for a lunch or coffee only to get that text that says ‘Sorry, but I’m running 15 minutes behind’? I can answer for myself – often (I’m also a perennially early person – when I’m on time I feel late, so I often have a few minutes to spare when I arrive somewhere).

What do you do to make this time ‘productive’? I often find myself reading the ‘newspaper’ on my phone. There are many times, however, that I would rather be reading something that I had WANTED to read, but didn’t have time to read when I ran across it. In other words, that article in PC World that I meant to get back to, or an article on what my beloved Phillies are going to do in the off-season to shore up the bullpen. Be clear, these weren’t articles in a magazine or newspaper that I ripped out to get back to later…these were online articles that I just didn’t have time to read when they flashed across my screen. Oh, I’ll bookmark the pages…and say ‘I’ll get back to that when I have time’, then the free time and my ability to locate the article and my proximity to my desktop that contains the bookmark are all in different places on the space-time continuum. In other words, the articles probably don’t get read.

Enter the neatest little application by the name ‘Pocket’. Pocket allows you to take all the articles you want along with you on any device you use. Best of all, it is SIMPLE and FREE. How easy? Real easy:

Simply go to http://getpocket.com/ and sign up for an account. They only ask for a username, password and email address. That’s it.

pocket signup form

Once you create your signon, you’ll be taken to a screen which allows you to choose how you want to save your pages:

pocket getting started

Clicking on the ‘Learn How’ link takes you to this screen:

pocket how to save

Install the add-on to your browser that will allow you to ‘pocket’ the articles. Once you’ve installed it, then this icon appears in your browser:

Click on that icon from any page and it ‘illuminates’:

That illuminated icon means that the webpage has been ‘pocketed’ and will be available from any other device on which you have Pocket installed.

Start ‘pocketing’ any articles that you want to ‘get back to’. They’ll appear on your Pocket dashboard:

Now, go to the App Store for your ‘other’ device(s) and download the Pocket App. You’ll be able to read any of those articles – wherever you are and whenever you have the time. If you want to get fancy, you can tag archived items in order to group similar articles together. There are even options for saving via email or Twitter (in fact, over 300 apps let you ‘Pocket’ directly). Now that you’re aware of Pocket, you’ll start seeing the little pocket icon show up in lots of places.

Here’s to making non-productive time more productive!

Creating and Editing your Microsoft Office docs on your iPad

As many of you know, I was a late adopter to the iPad world. I didn’t get my iPad until the latest release last spring (2012). While I love the easy of use/access, I was having a hard time swallowing the need to purchase an App to effectively edit my Microsoft Office documents (after all, I’d already paid several hundred dollars for the desktop version – I did NOT want to shell out more). Therefore, I used my iPad primarily for checking emails, looking things up on the web, etc. Not for “real” work.

I had asked around my many iPad-using friends to find out what they use for Office Productivity. Some had purchased the Office App. Others use a myriad of other tools which have sprung up to close the gap between Office Documents and the iPad. When I asked what they thought of the solutions, there were varying degrees of satisfaction – from ‘not happy with the solution’ to ‘it’ll do for now’. None of those responses enticed me to try the solutions…I thought ‘there’s gotta be something better’!

Regular readers to this Blog will not be surprised that I finally got a remarkable solution – from my 85-year-old Uncle!!! Of course. Leave it to him to come up with a F-R-E-E and easy-to-use App that allows you to work within the Microsoft Office ecosystem on your iPad (Word, Excel, Powerpoint).

…and what is this wondrous app??? It is called CloudOn (www.cloudon.com) and let me tell you, it has changed my world on my iPad. One word of caution…the service is so terrific (and did I mention F*R*E*E), that it has, at times, gone down. Not my app, but the main website. Apparently, they will not allow new users to download the app if their capacity is hitting critical mass. If this happens to you, just try back a day or two later.

Anyway, what does it look like and how does it work?

First, you need to download and install the CloudOn App (it works on i-Things and on Android). CloudOn piggybacks on your DropBox installation, so if you haven’t set that up on your PC and iPad, then you need to download that service first (I haven’t tried it, but CloudOn is also supposed to work with the online storage BOX and Google Drive). For more information on DropBox, please read this Blog Post from September.

Now, let’s see how easy it is to use. Here is a document that I started on my PC (click on an image to enlarge):

Word Document Sample for CloudOn started on PC

Now, I will save this document to my DropBox folder and move over to my iPad…Tap the CloudOn icon on my iPad:

CloudOn icon

The window which appears will display your DropBox documents:

CloudOn Initial Screen

Scroll across until you see the document that you want to edit and double-tap the document to open it:

CloudOn Select Document

Add/Edit/Delete to your heart’s content:

CloudOn changed document

Any changes to the document are automatically saved (no function).

Open the document up back on your desktop and you’ll see the changes!

Suddenly, my iPad just became a much more useful productivity tool…thank you, CloudOn!!

How do I convert my Video/Audio files to view/listen on my PC?

There are what feels like a million different audio and video formats – each of which plays on a different device. GRRRRRRRR!!!! So frustrating…I never seem to have the correct format for the correct device.

A good friend of mine had to take video for work, then upload it to the web in a WAV format. She figured…simple. Simply put the SD card from the camera in her PC and upload from there. Imagine her surprise when the format on the disk didn’t match the format that needed to be uploaded. What do do, what to do?

Luckily, we were able to find a FREE utility, ConverterLite, that is very easy to use. The only downside is the installation. Installation is a bit ugly. The install isn’t difficult, but the installer desperately wants to install a lot of bloatware (probably to help subsidize the free downloads). If you remain alert during the installation, you can avoid adding a lot of ‘stuff’ you don’t want on your computer.

So, let’s get started! First go to www.converterlite.com and click the ‘Download Now – It’s Free’ button. Save the file to your desktop, then double-click to begin the install. Here’s where you need to PAY ATTENTION:

Beware of the unintentional bloatware installation

On this screen, change the installation type from ‘Express’ to ‘Custom’. Once you do that, UNCHECK each of the options (unless you actually want the extra software installed). Click ‘Accept’ to continue the installation.

There will be several (I didn’t count how many) screens following which will each be trying to install additional software. Read each screen carefully and decide whether you want to Accept or Decline that portion of the installation. We want to install ‘ConverterLite’, but not a raft of other software.

Once the software is installed, you can click ‘ConverterLite’ from your desktop icon or program menu. Here’s the main (very simple) menu:

Click on the icon which represents the type of file you need to convert. When you click on it, an Explorer window will open. Navigate until you find the file that you want to convert and highlight it:

Then, click ‘Open’. You can select as many files as you like for converting – they will all list to the right side on ConverterLite’s home screen. That said, select all ‘Audio’ if you’re converting Audio files or ‘Video’ if you’re converting all Video files…don’t mix and match:

Click ‘Next’, and a new screen appears. Pick what type of file you want to convert TO:

If you select Video, you have a bunch of conversion type selections:

Click ‘Next’ again:

Click ‘Convert’ to convert the file(s) FROM the existing format TO the new format you selected.

My friend was able to convert from AVI to WMV with no problem. While this simple, free tool probably doesn’t allow for EVERY combination of conversion available, it solved this issue quickly and simply. For people who don’t do a lot with audio/video, this helps to make it a bit less intimidating…for a very nice ‘price’!

Dropbox – What is it? Why do you have to have it?

Sorry I’ve been MIA lately…I have a cartoon hanging on my refrigerator which says ‘Summer – where laziness meets respectability’. Somehow, while I’ve been busy all the time, I haven’t been as concerned about meeting non-client related deadlines…until Labor Day hit…now I’m trying to get back into the saddle and get going!

Anyway, you don’t care about that…you care about Dropbox – or want to find out WHY you care about Dropbox.

In a nutshell (and to use Dropbox’s own words), “Dropbox is a free service that lets you bring all your photos, docs, and videos anywhere. Any file you save to your Dropbox will also automatically save to all your computers, phones, and even the Dropbox website. This means that you can start working on your computer at school or the office, and finish on your home computer. Never email yourself a file again!” Additionally, you can quickly and easily share folders or files with anyone you choose. Maybe you won’t email large files again, either!

I don’t know about you, but there are many a time when I don’t have my laptop with me and I want to access a particular document. Maybe I’m at a client’s office and I need that ONE document I failed to bring with me. Maybe I’m with friends and I want to show them photos of my High School reunion. Whatever the situation, it is sooooooo hard to keep what files are where straight. Enter Dropbox.

I will admit it…I resisted setting up Dropbox. I don’t know why, I just did. Then, a friend of mine from High School put a bunch of ‘stuff’ up on Dropbox to share with the Class (our 35th reunion – YIKES – is next weekend). When I saw how easy it was to use (I could view files just by clicking on the link in the email. I could download files easily…I didn’t even need an account), I was thrilled. When I clicked on the link that I was emailed, I got to a page that listed all of the files/folders and I could see ANYTHING in there that I wanted:

Viewing Drop Box Files

It was the 70's - don't ask!

(Once I saw some of the photos, I questioned why I wanted to see them in the first place :-))

If I want to download the files to my computer (again, without creating any account whatsoever), I can just click and download:

So, because Dropbox was ‘nice’ and didn’t force me to create an account to get to the files I wanted to see, I decided to actually set up an account (just go to www.dropbox.com to get started). It was sooooo easy to do:

Enter your name, email and a password and away you go. The setup steps are clearly laid out:

They literally walk you through each step…with pictures and descriptions that are EASY to follow! NO techno-babble at Dropbox.

Dropbox gives you 2GB of storage – for FREE – initially. You can then ‘earn’ additional space. I’m up to 50GB by simply doing a 15 minutes ‘training’ and setup on various Dropbox features. To get more space, click on the ‘Get Free Space’ button – you’ll see the steps/alternatives clearly laid out. You can earn bunches of space…for free. It just doesn’t get much better than this!

Once you’ve set Dropbox up, putting a file in the Dropbox folder on your computer will sync it to your Dropbox account which can be accessed by signing into Dropbox from ANY internet connected device. If you want to SYNC the files between devices, just install Dropbox on each device (I’ve installed it on my smartphone and iPad) and you’ll have current files on each device…no more wondering which is the current version, or forgetting the file at the office.

The first thing that I did was upload the photos from my phone to Dropbox, so that I can access them on my computer. The files were available virtually instantaneously.

THEN, on top of that realize what you’re doing…you’ve got OFF-SITE BACKUP for important files. Make sure that those ‘I’ll be dead if I ever lose this file’ files are saved to your Dropbox folder…they will be automatically backed up each time they change.

Mac or Windows or Android…Dropbox has a place in your life!

Stay tuned to find out how Dropbox will assist you in maintaining Microsoft Office files on an iPad or iPhone…It’s pretty cool!

Modems, Routers and other things with too many wires attached

I feel like it’s time for another ‘Uncle’ update. Those of you who are regular readers know that my uncle is 85-years-old and LOVES technology. He’s pretty good at it, too. Pretty self-sufficient actually. He can put me to shame on some things. Interestingly, I got a 911 email from him just the other day. It goes like this (lifted directly from his text):

Couldn’t get online without going only through modem – so bought new Dlink router and problem solved – new one works, but now the desktop computer DVD player (drive d) doesn’t work and I am unable to get a secured network without installing from the Dlink DVD. Can get what they call an unsecured network but don’t know if that’s OK. Went online for answers to DVD not working. One suggestion said could be a registry problem, but don’t want to mess with that. Have definitely rebooted computer. Could buy an external DVD player, but would that work if there is a registry problem? Don’t want to buy a new desktop but is that the only answer? How about a new laptop with DVD player? TiVo needs a wireless connection for some of its goodies, but programming still works (for now)!

WOW!! How many people even KNOW the word ‘registry’ in terms other than ‘bridal’ or ‘baby’, much less someone with ‘octogenarian’ as a personal descriptor? His fearlessness in tackling technical issues head-on never ceases to amaze me. Of course, I called him back, but by then he’d worked 90% of it out for himself – he had a secure network recreated, so he could tackle the DVD issue at a later date.

I was telling a friend of mine about the email later in the day and she said ‘What’s the difference between a modem and a router’? Its not the first time that I’ve been asked that question, so I figured that even though my Uncle knows the difference, most of the ‘real world’ does not, and an explanation might be in order.

Disclaimer: This is NOT a scientific explanation, but the explanation I use in my head to keep all the pieces of equipment straight myself!

The “Modem” is the piece of equipment provided to you by your ISP (Internet Service Provider). This gizmo connects you with your ISP.

The “Router” takes the connection from the modem and routes (clever, huh?) information in/out of your modem to the various pieces of equipment – computers, tablets, and other wireless devices – on your network. Think of the router as an information traffic cop making sure that bits and bytes of data go to/from the various devices and the web without crashing in the intersections!

The modem is a one-to-one connection between your location and the ISP. The Router is a one-to-many connection between the modem and all of your equipment. Some of those pieces of equipment might be hard-wired (i.e. have a cable) between the device and the router. Others might connect to the router wirelessly. In many cases, printers and desktop computers have a cable running to the router, while laptops and tablets connect wirelessly.

Hopefully, your router has a password assigned to it which prevents people from connecting to the ISP (think, ‘I can’t get to the web’) without the ‘magic code’. If the router allows wireless connections, then it probably has a little antenna (or two) that stick up to help disburse the signal throughout your location.

These days, many ISP’s give their customers router/modem combinations. If your setup only has one ‘box’ to connect to, then your ISP has built the modem INTO the router, thereby making it an ‘all-in-one’ device of sorts. Helps keep the clutter down, but if either part goes down, you’re out of luck. Verizon’s FIOS service has these all-in-one modem/router combinations. These devices connect to the outside world, then between all the devices at the location – either wired OR wireless. On the other hand, Comcast often provides just the modem – you have to go out and buy a router (either for wired connections, wireless connections or both), to disburse the internet signal between multiple devices at the location. Common routers are DLink or Linksys, though there are oodles on the market to choose from.

One last note: If you only have one device to connect to your ISP, you may not need a router…you can just plug your device into the modem, and you’ll be all set. The router is inserted when multiple devices need to reach the ‘outside world’ or you need to connect wirelessly.

How did my Uncle solve his dilemma? Remember, he said that he COULD get ‘out’ by plugging his desktop directly into the modem. He did that – plugged his computer directly into the modem – and went to DLink’s website. Once there he located and downloaded the software to install the new router. He could then complete the installation WITHOUT the DVD player working. Once the software was downloaded, he switched the plug on the desktop from going directly into the modem to going through the router, installed the software, and he was off and running! Honestly, I don’t think that he cares that the DVD is broken now!

Password Protect PDFs

We’ve all done it…we’ve sent an attachment to an e-mail that contains information which shouldn’t be ‘shared’ with the public. Think documents which contain passwords or social security numbers or things of that nature. Maybe it’s a contract that has sensitive information. It could be pretty much ANYTHING that you don’t really want to share with the world. There have been times that I’ve hit ‘send’ then said ‘Ohhhh…I shouldn’t have sent that out there where it could be intercepted’. Other times, I didn’t give it a thought…just sent it. Sometimes (and I’m ashamed to admit this), I’ve known better, but cross my fingers and hope that no ‘mischievous’ person or computer will intercept it along the way.

Why didn’t I make a habit of sending things ‘protected’? Because I didn’t have a tool that was inexpensive which would allow me to password protect the files. I’ve written before (Creating PDFs for Free) about getting AND USING a PDF writer for documents which you don’t want altered (think contracts, financial calculations, etc.). While PDF’s prevent people from changing the contents of a document, ANYONE who has access to the PDF file can open/review it. Not necessarily good.

So, how to deal with this and become a better cyber-citizen? After you’ve created your PDF file, PASSWORD PROTECT IT!! How? Glad you asked!

There is a WONDERFUL site called PDFProtect (http://www.pdfprotect.net/)…and it couldn’t be EASIER…SERIOUSLY!!!

Simply go to pdfprotect.net. You’ll see this screen (click the image to enlarge):

Browse to the PDF that you want to protect.
Enter the password that you want to use for that file.
Click “Protect”.
You’re done.

This screen will appear – the protected file will be saved to your computer immediately:

Double-click in your downloads:

You will be challenged for the password (as will anyone who tries to open this document):

There you go! You can e-mail the document with peace-of-mind. Now, there’s no excuse for sending unsecured documents!!!

Move over OpenOffice.org, Kingsoft Office Suite has arrived

One of the most expensive pieces of software that I have on my laptop is Microsoft Office. I consider it invaluable…but I use it – intensely – each and every day. Many people don’t. Many people view/manage their email through webmail or on their smartphone. Others don’t work with Spreadsheets or Word documents very often, if at all. Some only make an occasional presentation. In other words, for many people the cost up to $499 for the Professional version (which includes Outlook and Access) is too steep of a price to pay…yet most people need SOME word processing, spreadsheet and/or presentation software at some point in time. Are you going to invest a minimum of $150 for the pleasure? Probably not.

For many people, the OpenOffice.org (www.openoffice.org) suite of software has been the ‘go to’ software for their occasional foray into desktop productivity for quite a while. OpenOffice is a true ‘suite’ of applications…containing modules named Writer, Calc, Impress, Draw, Base and Math. While I’ve always considered OpenOffice a great alternative to Microsoft Office, I feel like it doesn’t run terribly efficiently. It can take quite a while to open up OpenOffice and makes my computer sluggish. In fact, to my untrained eye, it appears that it actually opens ALL of the apps, even if you’re only trying to work in one of them.

For years, it was really the only viable alternative to Office…but now there is a new player in the F-R-E-E software arena – Kingsoft Office Suite (www.kingsoftstore.com).

Kingsoft has three modules: Writer, Presentation and Spreadsheets. Unlike OpenOffice.org, there is no database component or image editing. Kingsoft is the basics in terms of offering, but not in terms of features. When you open one of the programs up, unless you’re paying close attention, you’d think that you were in Microsoft-land (click on any of the images to see a larger image):

WRITER

SPREADSHEET

PRESENTATION

Kingsoft seems to open/save documents with standard Microsoft extensions flawlessly. The installation is fast and easy. The system resources consumed by the products seem minimal. All-in-all, a FABULOUS alternative to Microsoft Office for people who don’t want to invest the money or don’t use Office frequently enough to justify the expense. Now, when your high school friend sends you a spreadsheet of all your classmates for the upcoming reunion, you won’t have to say ‘sorry, I can’t open that’!

Can’t wait to download and install it? Here’s the link: www.kingsoftstore.com/kingsoft-office-freeware.html

Create Your Own PDF Forms – you know…fill in the blanks

PDF documents are pretty ubiquitous. Many of us who work in offices see them every day. Most times, they are just text, or text and images. Someone saved a Word document into a PDF format, so it can’t be edited, but can be read by everyone (well, everyone who has a PDF reader – and that’s most of us).

Sometimes, a PDF document is really a form that the user can complete/return. Some of them are just a form to print out (you can’t fill out the information on the computer). Some of them are interactive – that is, you can fill in the information right on the computer screen, then print/email the document. That’s kind of cool if you’re asking someone for information in a specified format. Making someone print out a ‘static’ PDF (one where you can’t fill in the blanks) requires them to fill in the entries by hand, scan the document back in so they can email it to you, or send you the printed out copy. If you send them a regular Word document (so they can fill it out on the computer), they can change things up – leaving the original formatting useless. If it’s a contract or other ‘official’ document, they could change the terms and return it to you and you might not even notice!

So, I would LOVE to have an inexpensive tool where I could create ‘interactive’ PDF documents, but it wouldn’t cost me a fortune. I don’t spend my life doing things like that…I only do it once in a great while.

I always thought that the only way to create these ‘form’ PDF’s was to have the full-blown Adobe Acrobat product (cost at time of this writing – $449.00 on Adobe’s site). I don’t know about you, but that’s NOT a price that I can stomach. I need to create PDF forms occasionally. When I’ve had the need, I’ve tended to just created Word documents and hope for the best. Now, I’ve found a new program that allows me to create Form PDFs for FREE – YEAH!! The promised land!

In the past, we’ve covered creating a ‘normal’ PDF document with a free PDF writer (http://www.yourtechtamer.com/blog/2010/12/creating-pdfs-for-free/, however, this was just to turn a ‘normal’ document on your computer into a PDF – its not ‘interactive’.

Welcome PDFescape! I’m so glad that we found you!!! To quote from their website (www.pdfescape.com), “PDFescape is a free service. Users of PDFescape can upload files to view them, modify them, form fill them, and even create new forms. No logo, watermark, or other tag is added to your file. PDFescape is truly free.” Hip-hip-hooray!!!

Let’s see what it’s like (click image for larger view):

First, there is NO SIGNON required. If you want to save your documents to PDFEscape’s site, then you need to create a signon, but otherwise, it is an ‘open’ world!

This document took me under 5 minutes to create – and I had never looked at how to do this before now.

You simply click on one of the types of information you want to put on your PDF (I’ll click on ‘text’):

Then you click on your blank document and start typing. When you’re done, click the yellow bar to disable and move onto the next item. Click on images and you can upload images to your document. Form-fields are a snap:

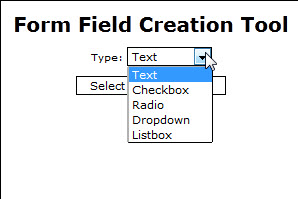
There are five (count ’em FIVE) types of form-fields you can add: Text, Checkbox, Radio button, Drop-down, or Listbox. I added a text field and a drop-down. For the drop-down, I created several selections.

In order to make the choices for the drop-down field, I had to right-click on the field I had inserted and select ‘Properties’:

Then, I just typed in the values that I wanted the user to see (DE, NJ, PA, NY):

When I was done ‘creating’ my entire document, I simply hit this button:

and I was able to download/save the document to my local computer.

Remember, I never created a signon, so when I finished my ‘virtual’ work, I had to save it somewhere! (If I’d created an account, I could have saved the file online).

What were the results?

I could then send this document to anyone to complete…here’s what a completed form looks like:

Now, all that anyone needs to do is print it to a PDF and email it back to me! I have a lovely, consistent, legible form to work from. HOORAY!!!

Legitimate Internet Threat – July 9th – You COULD lose your internet connection…

There is so much misinformation on the internet and about the internet, that sometimes it is hard to tell truth from fiction. This time, rumors that you might lose your internet connection on July 9th, 2012 ARE LEGITIMATE!!!! The more technical description circulating about this malware is ‘DNS Changer’ (which means nothing to most non-technical people).

FEAR NOT, however, as there is a way to check and a way to correct, should your computer be infected.

Background: Back on November 8, 2011, the FBI arrested a group who was using a botnet (one type of method for computer infection) to ‘hijack’ users computers. This group was known as “Rove Digital” and was wrecking havoc in computers across the world. If you’re like me, you ask, “So, if the FBI arrested the bad guys back in November, what do I have to worry about on July 9th”. In laymen’s term, here is what happened:

Something called a ‘DNS’ takes part in every internet search you do, or every connection you make through the internet. The user friendly URL’s that you enter into your browser (e.g. www.google.com) or search results you click use a DNS to translate the user-friendly URL into techno-babble. An analogy is that a street address is translated by your GPS into longitude and lattitude coordinates. Similarly, the internet uses DNS to translate from a URL that you and I understand, to a computer server’s technical address, and delivers you to that site.

The bad guys injected half a million computers with malware that would redirect you from the destination you WANTED when you enter information in the URL to some other location giving you false results on your screen that LOOKED legitimate. In other words, they gave you an alternate view of the internet universe. WHY? To make money from advertising…illegitimately…among other things.

The FBI and others not only uncovered and arrested thieves, but went one step further in making sure that the ‘bad’ servers (the ones that infected machines are directed to) were replaced with ‘good’ servers (clean ones that the Internet Gods control). So, since November, any computers infected with the malicious code have been getting ‘good’ results. In other words, infected machines have been re-routed to the correct web sites according to their searches and URL’s clicked. Infected machines display no ‘symptoms’.

Sounds good, right? Well, here’s the rub. On July 9th, 2012, these replacement servers are BEING TAKEN OUT OF SERVICE. What does this mean to you? If your computer is infected, then your computer will be unable to figure out which website you’re trying to get to when you open up your browser, and you will be in an internet blackout. The idea is that during the time between November 2011 and July 2012, people could carefully mitigate the evil infection without an unplanned outage. Unfortunately, if you don’t check, you might still find yourself with an ‘unplanned outage’.

FIND OUT NOW IF YOUR COMPUTER IS INFECTED!!! Go to http://www.dcwg.org/detect/ (it just takes a second) and find a link with which to conduct a test. If you’re clean, you will have no issue on July 9th. If, however, your computer returns infected, follow the directions on the trusted sites (you can get there through either of the links below) and clean it before July 9th.

(More info here or here or here)

Over time “Rove Digital” infected over 500,000 computers – INCLUDING APPLE COMPUTERS!!! Better safe than sorry!!!